
Do you remember the first Marvel comic movie? The first movie was Iron Man on 14. April 2008. If you like to get a vision of future personalize home automatization assistants just have a short look at the personal AI assistant Jarvis, which is presented right at the beginning of the movie. Jarvis is the so called “master of the house” and is able to control and adjust the home or to grant access into rooms. But even more, Jarvis is some kind of an AI with access to all digital data of Tony Stark -such that Jarvis is able to gather information and take conclusions. Of course, it is just a comic movie – but isn’t there a kind of similarity to Amazons Alexa?
By having a look at our nowadays technology evolution, applications like Jarvis may arise soon. This is based on three different factors. At first, more and more devices are being connected to the internet (the so called Internet of Things (IoT) age). Likewise the technology is on the cusp of AI mass production and maybe the most relevant point cloud computing enables the handling of processing a huge amount of data in a decentralize approach, whenever it is necessary. On the one hand these automatization systems provides a lot of convenience, but on the other hand they lead to changes of the user interface. Today, interacting with computer systems is every time a media disruption – we need to take our mobile phone and press buttons on a glass plate, isn’t it weird?. I believe that using speech for interacting with our applications will change our life in the way smartphones have done it.
This evolution and the vision of a personalize home automatization assistant shown by the Iron Man movie really impressed me. Wherefore I started my personal home automatization project on a small scale. In this blog entry I would like to give you a little overview about the project which I am working on for the last months. It won’t be an instruction how to set up a personalize home automatization assistant, but it will show you my architecture, my used tools and several ideas how to start yourself. The goal of my project is to use a minimum of coasts and effort to achieve a maximum of benefits.
Why I started
I have had five different remote controls – one for the TV, one for the AV receiver, one for the projector screen, one for the projector itself and at least one for the remote control outlets from the construction market. It was terrible and totally not user friendly. I always had to look for the right remote control and never find them shortly. This was the starting point to think about how to reduce the amount of remote controls I use and to enable the different devices with a configuration directly for my needs (i.e. as a predefined activity/scene). Additionally I set the restriction to steer all devices through my mobile phone – as I am using Apple devices, I decided to integrate HomeKit to achieve this requirement. But how to add non HomeKit certified devices into HomeKit? And how to create predefinitions for an activity or scene to run all devices at once? There is a colourful bouquet to solve this unfortunate problem.
How to start with the home automatization
Every new beginning is difficult, especially when there are different ways to reach the goal. I defined my vision as follows:
- I will use as much as possible of my existing equipment to reduce the coast of buying new stuff
- My devices and their common interaction have to be accessible over HomeKit and Alexa
- Being aware of security issues, to reduce potential attacks
- I need to gain access to the home automation for others if necessary
With this starting point I looked around for different possibilities. Of course, I could buy for example new remote control outlets which can be directly interact with Alexa or HomeKit. But this new outlets are expensive and when I started my home automatization there were only outlets which work either with HomeKit or with Alexa. To be able to combine my different devices and my use cases with HomeKit and Alexa, I recognize that I will need a middleware to achieve my goals. Today, you will find different middleware systems which will offer you a lot of functionality to connect different devices to each other. Even there are much more solutions outside, the four biggest open source platforms for a home IoT server are the following:
As usual all have assets and drawbacks. I do not want to write down a list with pros and cons for each of the different solutions, because a list can be easily found by using google. For my home automatization I decided to use FHEM. The advantages of FHEM are the stability of the system, a big community and a lot of packages for different devices. It is good to maintain and provide security possibilities. Because of the big community the main setup was fast and easy. For the setup and installation I mainly orientated myself with the great instructions from haus-automatisierung.com. For my first steps I begin with the following equipment and hardware:
- Raspberry PI with Debian Stretch and FHEM as my home automation server
- Connecting my remote control outlets from the construction market (brand: intertechno, model: ITLR-3500) by using an emitter with 433MHz (so called CUL) bought at busware
- Connecting my remote projector screen from the german manufacture visivo by using an Arduino Nano micro controller with a specific 315MHz transmitter (by using the FHEM module SIGNALduino)
Setting up the Raspberry PI with FHEM and integrate all the transmitters was pretty seamless due to the detailed explanations in the FHEM Wiki and the tutorials at haus-automatisierung. The first automatization was done.
The next step
After setting up the main infrastructure (Raspberry PI with the different transmitters and FHEM as a central steering component), I wanted to integrate further devices into my home automatization. The major benefit I had in mind, was a possibility to control my multimedia devices like radio, AV receiver, TV and projector such that just one command will bring them all into the correct state. Afterwards also my lights and the heating should adjust themself i.e. the lights should turn on when the sun sets and someone is at home or the heating should turn off when the last person leaves the home. In the next parts I will explain which hardware and tools I used to connect the equipment with FHEM.
Integrating TV, AV receiver, projector, radio …
Like I mentioned before, my living room resembled a zoo – many different exotic species of remote controls lifed there. I saw that it would be great to just have one command to control configurations of different devices. For example, I have a TV and a projector as two kinds of displays and I also have different input devices, like a Blue-Ray player, a Sony Playstation, an Apple TV or a set-top box for normal TV. All of them are connected to an AV receiver on different HDMI input channels. Since the AV receiver has only one HDMI output, the TV and the projector are connected to a HDMI splitter. What I wanted to realize was a command like “turn on Apple TV with the projector” which will turn on the AV receiver, projector and Apple TV, will set the correct HDMI input on the AV receiver, enable the correct “sound field” and choose the right HDMI output. If a scene is running and a new command like “play CD” will be activated, the projector and Apple TV should shutdown
whereas the AV receiver have to change the HDMI input and the CD player have to turn on.
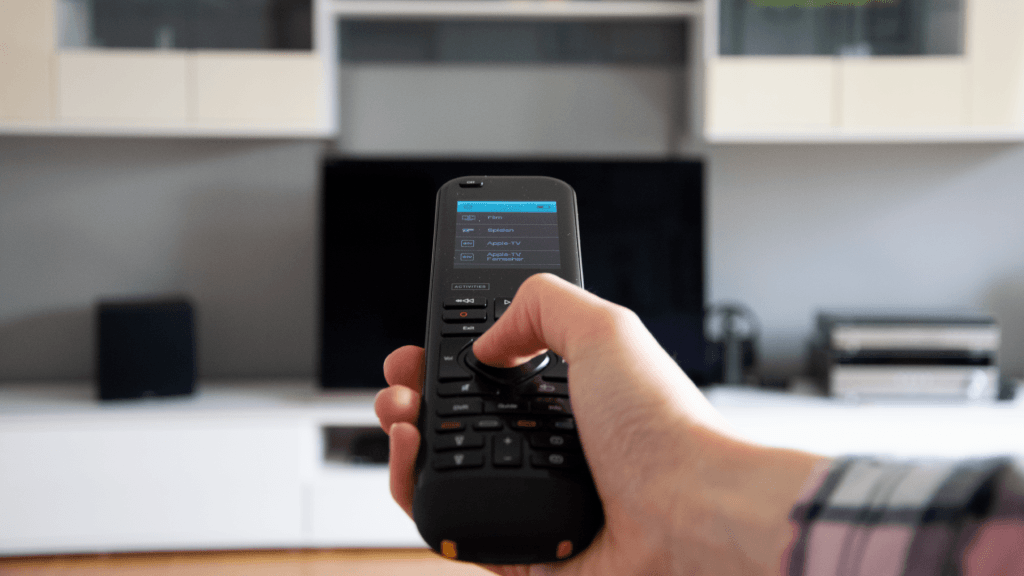
The easiest way to handle all the various combinations is to use the Logitech Harmony Elite. In general the Logitech Harmony Elite is a universal remote control which is able to work with all infrared, bluetooth or WiFi devices. It is easy to configure different combinations of devices and save them as an unique scene. If the harmony scenes are defined it is possible to use the harmony-fhem module to integrate them into FHEM. Afterwards also devices, which are not steered by the Logitech Harmony Elite universal remote control can interact with the harmony scenes through FHEM.
For example the projector screen is triggered through a 315MHz transmitter which is connected to FHEM when a particular harmony scene is activated.
Integrating lights
Over time, I have tested different approaches to integrate ambient lighting like MI Light as a very cheap version, Philips hue or Nanoleaf Aurora. Integrating MI Light into FHEM is in general possible, but it isn’t stable and useful unfortunately. Hence I tried Phlips hue which is more like standard led lamps and Nanoleaf Aurora which is a light design element. Both lights are easily to set up and can be also integrated into FHEM by hue-fhem and aurora-fhem. In addition FHEM is also able to control lights by turning on or off the remote control outlets when a specific harmony scene is used. With this options more and more combined actions can be realized.
Integrating heating
The next step of the project personalize home automatization assistant, was to change the manual thermostats of the room heater to digital once. With FHEM, there are several brands which can be used in the market. I decide to take tado, a young startup company in Munich Germany. The installation was totally fast and with the module tado-fhem thermostats are useable with FHEM.
Integrating weather, temperature and humidity
To adjust the heater with the tado thermostats depending on the outside weather conditions, I integrated different sensors from NETATMO weather by using the netatmo-fhem module. Netatmo provides sensors for rainfall, wind strength, inside and outside temperature as well as inside and outside humidity. Having the sensor data available in FHEM, weather specific adjustments can be deposited.
Integrating house behavior
The last topic I wanted to achieve was a kind of home behavior information. This means I wanted to know some different status of my home. Here I choose products from Elgato Eve. Right now these are the only devices which are not integrable into FHEM. Nevertheless I tested them and decided to use the Eve Door & Window as well as the Eve Smoke to control some open/close states of my doors and to have a fire alarm with a reminder for regular signal tests. Because of the non-integration into FHEM, the Eve sensors are the only devices which are just available in HomeKit.
Next to the Eve sensors I integrated my robot vacuum cleaner Neato Botvac Connected. This enables me to get different status and cleaning reports. With the module botvac-fhem the cleaner can be included into FHEM. By achieving this integration, it is possible to connect the cleaner to various conditions provided by the information of the other sensors in FHEM.
At least my router, an AVM Fritz!Box, was embedded into FHEM by using the fritzbox-fhem module. This leads to having all informations and possible actions from the Fritz!Box available in FHEM and being able to forward them to various other user interfaces like Alexa, HomeKit or Google. For example the guest network can be switch on and off more easily or the DECT search for new telephones can be started directly from FHEM.
Summary
To sum up this subchapter, I would like to give you an overview of the above described and integrated devices. First the main interface hardware will be listed, followed by the additional equipment:
- Raspberry PI with Debian Stretch and FHEM as main middleware
- A 433MHz emitter connected to the Raspberry PI to control remote outlets by FHEM
- A 315MHZ transmitter (build by a Ardunio Nano and 315MHz sender/receiver) connected to the Raspberry PI to control a remote projector screen by FHEM
- Logitech Harmony Elite with harmony-fhem to control all infrared, bluetooth or WiFi devices which have to work together by various configured combinations.
- Philips hue with hue-fhem to control hue lights.
- Nanoleaf Aurora with aurora-fhem as a light design element.
- A smart thermostat from tado with tado-fhem to steer the heating inside the rooms.
- To steer the heating according to outside conditions, I used NETATMO weather with netatmo-fhem.
- The Botvac Connected robot vacuum cleaner from Neato with the FHEM module botvac-fhem.
- Embedding the AVM Fritz!Box router by using fritzbox-fhem module.
- To get door and windows status Elgato Eve Door & Window was integrated.
- Elgato Eve Smoke was used for fire protection.
Having all equipment embedded into FHEM, constructing rules or sequences about when, what and how things should happen can be realized. Of course, some of the used devices, like for example the hue and aurora lights, can be connect to the smart home provider without going the way using FHEM. I tried to have all components included into FHEM to use it as the central device station to external interfaces – in my case HomeKit as the clickable and Alexa as the voice-operated user interface. In the next part, I will introduce how this last goal can be reached.

The picture above shows some of the described devices and how they are interlinked. On the left side the two input applications, Amazon Alexa and Apple HomeKit are shown. The command is forwarded by the router to FHEM which is running on the Raspberry PI. Afterwards the command is sent to the IoT equipment.
Enabling Speech & HomeKit
Beforehand you got an overview of the devices I added into FHEM. The next challenge was to pass through the FHEM IoT devices into Apple HomeKit and Amazon Alexa. Unexpectedly it was much simpler to realize then I thought.
HomeKit
To use HomeKit in a reasonable manner, a control center have to be set. This can be an Apple TV or an Apple iPad. Only, if this one Apple control center device is online, your smart home devices are controllable via Apples HomeKit. I decided to buy an Apple TV for this usage. After the normal installation via the Apple HomeKit interface I had to add the FHEM devices. With the NodeJS application Homebridge this step is possible. Homebridge is fast and easy to install on the Raspberry PI and can access a special area in FHEM. All FHEM devices which should be steerable via HomeKit need to be tagged in FHEM and can then be recognized by Homebridge. Homebridge itself acts like a typical “bridge” device for HomeKit (i.e. Philips hue bridge) and generates a HomeKit key. After entering this key into the HomeKit interface all tagged FHEM devices will appear in HomeKit. And thats it – from this point you are able handle all this devices with the HomeKit interface and use all provided HomeKit features.
Alexa
For the speech control of the IoT devices I decided to test out Amazons Alexa by using Amazon Echo and Amazon Echo Dot.
Like with Apples HomeKit, the deposited equipment in FHEM have to be founded by Amazon Echo. An additional application, called HA Bridge solves this requirement. The HA Bridge can also be installed on the Raspberry PI and provides an interface to add basic commands from other IoT devices. In this use case I added “On” and “Off” commands for each FHEM device I like to control via voice commands. To connect the HA Bridge with the Amazon Echo devices, HA Bridge emulates a Philips hue bridge. This enables the Echo equipment to find the HA Bridge in the home network and to integrate the added devices into the Alexa App. Afterwards all further configurations for the interaction between the device can be made through the Alexa App.
Thats it – with this setup a personalize home automatization assistant, in this case Amazons Alexa or Apples Siri, is ready to use. The main advantages of this approach are, that there is no limitation of IoT devices. It does not matter, if a device is certified for Alexa or HomeKit because it is always integrable via HA Bridge or Homebridge when the device is added into FHEM.
How my life changed
One of the headlines for this blog post was “The human interface evolution”. I took this headline because of the way my life changed by using the installed home automatization and the speech commands via Amazon Alexa. Interacting with systems by using speech instead of the typical interfaces (i.e. a smartphone display, mouse or keyboard) leads to a more natural exchange. I remember how unfamiliar it was to ask Alexa to do something. Nevertheless I get use to it very quickly. Nowadays the speech control is a great improvement. Think about cooking in the kitchen and having no free hand but the need to reduce the volume of the radio. Of course, you can put your stuff aside, wash your hands and then reduce the volume. But isn’t it easier to just say “Alexa, reduce the volume of the radio”? Another example could be to automatically adjust all lights to a specific level by launching a film on the TV or shutting down all electrical equipment when you go to bed.
Right now I have speech commands for various routines of my home IoT devices. With this setup a lot of usual work is done by the home automatization now and some aspects of a more comfortable living are noticeable. Even if the system does not automatically adjust itselfs (someone will maybe call it learn) to particular situations, it is good enough to assist in the most daily necessities.
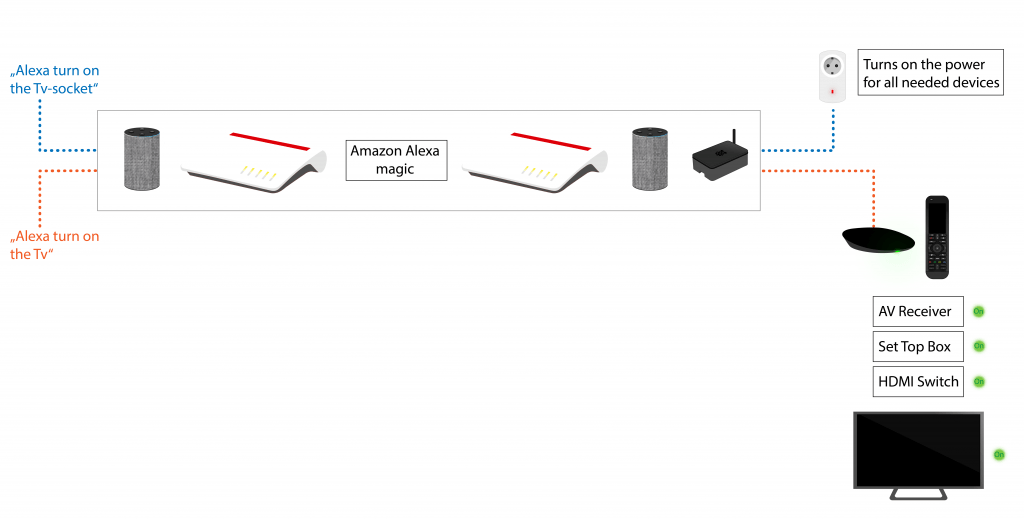
The illustrated image shows a short overview of the data flow to turn on the TV correctly. The recognization of the voice command does not happen directly on an Echo device, it has to be processed in Amazons Cloud (“Amazon Alexa magic”). Only the steering command return to the Echo to be send to the corresponding IoT devices.
What is about security?
Some of my friends and colleagues ask me about the security aspects of such a high integrated IoT system. All interfaces on the Raspberry PI, like FHEM, Homebridge and HA Bridge are only accessible inside my home network. They are secured with HTTPS access only. The gateway for the pass through of the IoT devices to HomeKit and Alexa is an Apple TV as well as an Amazon Echo device. Both devices can enable and disable devices from FHEM through the applications Homebrige and HA Bridge – but only if they are in the same network and have a corresponding keyphrase. Additionally I use different user roles for the Debian Linux distribution on the Raspberry PI with the goal to separate the user which is running the application from the operating linux system. Furthermore the different commands to turn on or off IoT devices are logged via FHEM and if something is weird (i.e. to much commands in a short period of time) an alert is generated.
By being aware of the different data streams and having encapsulated FHEM, Homebridge and HA Bridge the home automatization provides good security approaches which seams to be adequate for the requirements today. Even if an attack will happen, the attacker is just able to turn off and on the different equipment or adjust the volumes. The question is: Is it worth to invest an amount of effort to achieve such a little impact for an attacker?
What is open
I am very satisfied with the effort and resulting benefit of my home automatization. It’s great to have this simplification. But there are still open points I would like to improve and to work on. Here is a short list of my further todo topics:
- Right now I am driving an VW Tiguan with mobile online services (called CarNet). For example, the door state, the park position and activating the auxiliary heating of the vehicle are accessible via an online interface. Actually there is no solution provided from VW to link this mobile online services into other applications like Amazons Alexa or Apples HomeKit. But it seems to be possible to use the web interface of CarNet to connect the vehicle with FHEM. Right now I am working on a FHEM module to easily realize this integration.
- All the software applications on the Raspberry PI are running native. In future I would like to have FHEM, Homebridge and HA Bridge in separated Docker containers. This helps to keep the system more stable and leads to a fast restoring if something will go wrong.
- Next to the control with HomeKit and Alexa, I work on a second Raspberry PI with a display to build an own UI for the various devices.
Summary
In this blog post an overview of a home automatization is given. It focuses on using FHEM a Raspberry PI as the main middleware to connect various IoT devices. Afterwards some of the devices were pass through via Homebridge to Apples HomeKit or via HA Brdige to Amazon Alexa. By using this architecture with the explained different IoT devices a large flexibility is given. Integrating one of the digital assistants (i.e. Microsoft Cortana, Apples Siri, Amazons Alexa or Google) lead to a personalize home automatization assistant. This enables the user to control the home with a smartphone application as well as over speech commands. In cases of home automatization speech control is a huge advantage, because the interaction can be done from nearly everywhere without any additional devices like a smartphone. Even if home automatization do not have a high penetration today, it will enter more and more into the daily live in the future.
This blog post is no advertising for any product I just wanted to show which devices and solutions I used for my home automatization approach. There are many more good devices which are useable for home automatization in the market.